If we’re being honest, how many of us are just going through the motions when it comes to daily money management and dealing with our bank account?
After all, many of us have chequing and savings accounts, a couple of credit cards, and probably a few investments to our name – but how many of us can really claim to be pros when it comes to money management?
Probably only a select few, but all is not lost for the rest of us.
The following is the deepest dive you could possibly take on banking. By the end of this, you’ll know everything there is to know about money management to the point where your financial advisor will probably start paying you for advice.
All jokes aside, this is the most comprehensive article on banking you’re ever going to find, including a full dissection on most bank accounts you can possibly open, the major payment methods available in today’s society, plus budgeting, retirement planning, and how to financially navigate some major life events.
So come along on this journey with us because by the time you reach the end of this odyssey, our hope is you’ll have the tools to face anything that could possibly befall you over the course of your banking life.
- Everything about your bank account in Canada
- How to make purchases in Canada
- How to budget – and actually stick to it
- How to start retirement planning
- Money management for major life events
- 10 more money management tips
- FAQ
Everything about your bank account in Canada
If you want to understand everything about banking and, by extension, money management, the best place to start has got to be your bank account. After all, the way your money flows in and out of your various bank accounts sits at the very core of everything else you might do with your money.
So if you want to understand banking in general, you must first understand your bank account. Let’s get started.
Types of bank accounts
You might think you know all the different types of bank accounts available in Canada, but do you really?
The variety out there certainly goes beyond a chequing and savings account, but those 2 options are certainly the best places to start.
Still, with so many different types of bank accounts actually out there, choosing the best one(s) for you can be deceptively difficult, which is why we’ll go through each type of bank account for you here.
Chequing account
A chequing account is essentially a way station for your money.
It’s where your money comes in and your money goes out, making it where all your typical banking actions emanate from. The actions we’re thinking of include:
- paying bills,
- moving money into your savings accounts,
- transferring money to your investments, and
- sending Interac e-Transfers to family and friends – to name a few.
It’s also called a chequing account because it’s where the money behind the cheques you write is debited from.
Even though most of us rarely use cheques anymore, the principle still holds – your chequing account is the one where all your payments come from, whether that’s after using a debit or a credit card, taking money out of the ATM, or transferring money somewhere else.
While all your money comes out of your chequing account, it likely all comes into it as well. This is the account where your paycheques go and where any source of income will first appear before being transferred or paid to somewhere else.
Typical structure of chequing accounts in Canada
Try to open a chequing account in Canada and you’ll quickly discover there are several plans to choose from with monthly fees, minimum balances to waive those fees, a certain number of free transactions, and, on some plans, various special extras.
It can be quite time consuming to sort through and compare it all, so we did the work for you in the table below:
| Chequing account | Fee per month | Minimum balance for no fee | How many free transactions? | Extras |
|---|---|---|---|---|
| Bare bones | Around $4 | N/A | 10 - 12 | None |
| Base account | Around $11 - $12 | $3,000 | 25 | None |
| Middle of the pack | Around $16 - $17 | $4,000 | Unlimited | Some, like a welcome bonus and discounts |
| Top-tier | Around $30 | $5,000 - $6,000 | Unlimited | Lots, like a welcome bonus, safety deposit box, fee waiver on credit cards, etc. |
As you can see, if all you want is a basic chequing account, you’ll pay a low fee. But you will receive no other benefit, with the lowest number of free transactions, no minimum balance to avoid the monthly fee, and no extra perks whatsoever. If you use your debit card often, you'll easily go over the minimum transactions and be paying around $1.25 every transaction for the rest of the month.
Shell out $11 to $12 a month and it gets a bit better for you because at least there is a minimum balance to avoid that monthly fee (quite high at $3,000) with a hard cap of 25 transactions, and still no extra perks.
It’s only when you start paying around $16 to $17 that things start to get a little more interesting. The minimum balance to waive the monthly fee is still high at $4,000, but you’re finally starting to get into unlimited transaction territory and you get some perks, like a welcome bonus, which is basically free money put into your account – usually around $300.
Finally, there’s those top-tier chequing accounts (the ones the banks will basically start rolling out the red carpet for you on). These cost around $30 a month, and you have to keep a consistent balance of up to $6,000 to waive the fee, so this is not for a low income earner.
You’ll get unlimited transactions (and honestly, that’s the least they could do) but you’ll also get a ton of priority client bonuses. These are things like a small safety deposit box, an annual fee waiver on certain credit cards issued by your bank if you have them, plus the welcome bonus that the mid-level accounts give you.
Honestly, the list goes on, and on, and on. For example, if you open a Scotiabank Ultimate Package you can earn Scene+ points on debit transactions and get unlimited Scotia International Money Transfers.
If you can afford it, a top-tier account at any Canadian bank is pretty swanky.

Minimum Balance To Waive Fee
$6,000
# Of Free Monthly Transactions
Unlimited
# Of Free Monthly Interac E-Transfers
Unlimited
Monthly Fee
$30.95
The Scotiabank Ultimate Package is the chequing account that offers everything. From unlimited transactions, credit card fee waivers, a free safe deposit, rewards on debit purchases, increased interest rates on GICs and savings accounts, and more, this account includes everything you might need from a chequing account.
Pros
- Get a $125 GeniusCash boost
- Get up to $700 in welcome bonus cash
- Unlimited transactions
- Plenty of physical bank locations
- Save money on premium credit cards
- Exclusive rates and fee rebates for other accounts
- Earn rewards
- Minimum balance to waive fee
Cons
- High monthly fee
- Minimum balance is a wasted investment opportunity
- You may still be charged for non-Scotiabank ATM withdrawals
Provinces
ALL
Eligibility
- You must be at least 16 years old
- A Canadian resident or you're here for work or study
- Opening this account in your own name
Why You Want It
 $125 GeniusCash + Get up to a $700* welcome bonus + Up to $150 annual credit card fee waivers.
Special Features
- Earn Scene+ points on debit transactions
- No monthly overdraft protection fee
- Unlimited free Scotia International Money Transfers
- Up to $150 annual fee waiver each year on select credit cards
Minimum Balance To Waive Fee
$6,000
# Of Free Monthly Transactions
Unlimited
# Of Free Monthly Interac E-Transfers
Unlimited
Monthly Fee
$30.95
Excess Transaction Fee
$0.00
Excess Interac E-Transfer Fee
$0.00
Maximum Credit Card Annual Fee Waiver
$150
Maximum Welcome Bonus
$700
Promo End Date
July 02, 2026
Physical Locations
Automatic Budgeting System
Minimum Interest Rate
N/A
Earn Rewards On Debit Purchases
Free Cheques
Free Bank Drafts
Max Rebates For Other Accounts
$11.95
Discounts For Seniors
Discounts For Youth
Other Discounts
$125 GeniusCash + Get up to a $700* welcome bonus + Up to $150 annual credit card fee waivers.Premium vs. no fee chequing account
Now you can get no fee chequing accounts, especially if you look outside the big 5 and select a branchless bank (online only) like Simplii Financial, Motive Financial, or Tangerine.
They’ll usually give you free cheques, free Interac e-transfers, and of course, no monthly fees – but you’ll still have to pay transaction fees for ATM withdrawals outside of your network (like all banks) and you won’t get the same customer service with tons of perks that a premium account will give you.
If the premium offers free wire transfers, you’re paying for those with a no fee chequing account, along with most other types of transactions.
No fee banking is the no frills and no perks option for the banking client who chiefly wants to save money. They know what they're doing enough that they hardly ever need or want the bank's help – they just want to do their banking and be left alone.
Want an example to get you started with no fee banking? The Simplii Financial No Fee Chequing Account is one of the top rated options in Canada. Check out the details below:

Minimum Balance To Waive Fee
$0
# Of Free Monthly Transactions
Unlimited
# Of Free Monthly Interac E-Transfers
Unlimited
Monthly Fee
$0.00
Monthly fees on your chequing account can get as high as $30 per month, but thankfully the CIBC-owned digital bank Simplii has a solution for you. With the Simplii No-Fee Chequing account, you'll get unlimited access to your money, plus you can even use CIBC ATMs for free.
Pros
- No monthly fee or minimum balance requirement
- Free and unlimited transactions
- Earn interest on your balance
- Free international money transfers
- Free access to over 3,400 CIBC ATMs
- Get up to $125 in friend referrals
Cons
- Going into overdraft can be costly
- Extra fees on non-affiliated and international ATMs
- No extra bells and whistles
- Not available in Quebec
Provinces
AB, BC, MB, NB, NL, NU, NT, NS, ON, PE, SK, YT
Eligibility
- Resident of Canada
- Age of majority
Why You Want It
Earn $300 and a $50 Skip gift card + Unlimited free transactions for no monthly fee.
Special Features
- Free access to CIBC ATMs
- Send money internationally for free
- Valuable referral bonuses
Minimum Balance To Waive Fee
$0
# Of Free Monthly Transactions
Unlimited
# Of Free Monthly Interac E-Transfers
Unlimited
Monthly Fee
$0.00
Excess Transaction Fee
N/A
Excess Interac E-Transfer Fee
N/A
Maximum Credit Card Annual Fee Waiver
N/A
Maximum Welcome Bonus
$300
Promo End Date
September 30, 2026
Physical Locations
Automatic Budgeting System
Minimum Interest Rate
0.01%
Earn Rewards On Debit Purchases
Free Cheques
Free Bank Drafts
Max Rebates For Other Accounts
N/A
Discounts For Seniors
Discounts For Youth
Other Discounts
For even more no fee banking options, check out our article on free chequing accounts.
Savings account
Of course, the other half of most people's bank account tandem is a savings account.
What a savings account is for is in the name – savings. However, that can mean a number of different things. Most people keep their money in their savings account, just waiting for an emergency expense or a vacation they've always wanted to take. Or they simply want to let their money work for them and build a little bit of interest.
Some people keep their extra money in their savings account only to be invested later in GICs, stocks, mutual funds, bonds, commodities, or some other form of investment. The bottom line is a savings account is meant to keep your money so that you can save it for later.
It's not an account that you should spend from. In fact, most savings accounts punish you for taking money out of them by charging a fee every time the account is debited. On the other hand, they often provide free transfers from one account to another because they understand that at some point you're going to be moving your money into your chequing account to be spent later.
Still, the best use of a savings account is if your money is always there collecting interest and making you even more money just for being in your savings account.
High interest savings accounts in Canada vs. big bank savings accounts
Speaking of interest, you do have several options in Canada if collecting interest on your money is your main priority. The online banks offer very high interest rates on their savings accounts compared to the big 5 banks.
For example, the Neo Money account offers a savings account at 0.1% interest, as opposed to CIBC, which only offers a regular interest rate of 0.9% on their best savings account.
You can learn more about Neo's option here:

Minimum Interest Rate
0.1%
Maximum Interest Rate
0.1%
Balance Required For Maximum Interest Rate
N/A
Love having easy access to your money, but want to make the most of your cash savings before it's spent? With a Neo Everyday account, you can earn 0.1% on your balance PLUS an average of 3% cash back on your purchases (with a minimum of 1%). All transactions and Interac e-Transfers are free and unlimited.
Pros
- Available for youth, too
- Comes with a prepaid Mastercard
- No transaction fees
- No monthly fees
- Ability to build credit score with a Neo Membership
Cons
- Lower interest rate than the Neo Savings Account
Provinces
ALL
Eligibility
- Canadian citizen
Why You Want It
0.1% interest on your balance + ~3% cash back on purchases.
Special Features
- Earn up to 3% cash back on spending
- Free app for tracking your spending and savings
- Pairs well with other Neo products
# Of Free Transactions
Unlimited
# Of Free Interac E-Transfers
Unlimited
Max Promotion Rate
N/A
Welcome Bonus Value
N/A
Promo End Date
N/A
This is similar across the board when you compare the online branchless banks' high interest savings accounts to the big 5 banks and interest on their savings accounts. You're looking at around 1.5% interest versus 0.3% or 0.7% as the regular savings account interest rates at the big 5 banks. It could be a different number but it's always going to have a 0 in front of it.
So if high interest is your thing when you're parking your money in a savings account, you can't really do better than the smaller online banks. However, the operative word there is small. The online banks have fewer ATMs in their network and just fewer ways to access them period, so you are sacrificing a little bit of convenience that you can always get from the big 5.
Some branchless banks are owned by a member of the big 5, such as Scotiabank owning Tangerine, which gives you access to one of the Big 5's vast ATM networks, so you'll have no problem accessing your money. At the end of the day, if you want convenience go with the big 5, but if you want high interest on a savings account go with the online-only or branchless banks.
Registered bank accounts: RRSP, TFSA, and more
There are also various types of registered bank accounts Canadians can open. These accounts are registered with the Canadian government and given tax-sheltered or tax-deferred status. This means you won't be paying tax on the money in the account in any year you make a contribution either at all (tax-sheltered) or until after the money is taken out (tax-deferred).
The types of registered accounts that Canadians can open include the following:
- TFSA (Tax-Free Savings Account): This account was established in 2009 to allow Canadians 18 years of age or older with a valid Social Insurance Number (SIN) to save money tax-free. Contributions to a TFSA are not deductible for income tax purposes, but are limited to $6,000 annually and $81,500 if you've never contributed before.
- RRSP (Registered Retirement Savings Plan): This account allows Canadians to save money for their retirement on a tax-deferred basis, which means any contribution you make is tax deductible that year and any money that is put into an investment as part of your RRSP can grow tax free. The only time you'll have to pay tax is when you withdraw the money from the account. Each individual will have a deduction limit and an annual contribution limit based on their income.
- RRIF (Registered Retirement Income Fund): This account is a tax-deferred retirement plan that can be used to generate income from the savings accumulated in an RRSP, starting at age 71. Investments in an RRIF grow on a tax-deferred basis and are only taxable when the money is withdrawn as part of your income.
- RDSP (Registered Disability Savings Plan): This account allows Canadians with disabilities the ability to save money for the future with the help of their friends and family up to a lifetime limit of $200,000. Contributions are not tax deductible and can be made until the beneficiary turns 59. The money is automatically withdrawn when the beneficiary turns 60 but is not counted as income. The government also assists by matching contributions through the Canada Disability Savings Grant or the Canada Disability Savings Bond and these portions are counted as income for tax purposes.
- RESP (Registered Education Savings Plan): This account allows parents and caregivers the ability to save money for a child's post-secondary education and grow their investment on a tax-deferred basis. The government provides a 20% matching benefit on up to $2,500 contributed annually through the Canadian Education Savings Grant. Low income families with an annual income of less than $49,020 can receive up to a 40% matching benefit through the Canada Learning Bond.
Due to the limits and matching benefits of registered accounts, they cannot be used as regular savings accounts. Those who go over the limit in their contributions will either have to pay back matching grants from the government or will be taxed on the excess dollar amount.
Tax benefits of a TFSA and RRSP bank account
The tax benefits of a TFSA and RRSP allow Canadians to not have to pay tax on their contributions in a given year up to a certain limit.
For TFSAs that limit is $6,000 annually and for the RRSP, the limit is set by the Canadian Federal Government each year. In 2021 it was $27,830 and in 2022 it is $29,210. However, you can carry over contribution room that you didn't use from the previous year indefinitely until age 71.
RRSP contributions are also tax deductible, so any contribution you make will lower your tax bill up to a deduction limit that's calculated as the lesser of the following:
- 18% of the earned income you reported on your tax return in the previous year, or
- the annual RRSP limit as listed on the previous year’s tax return, up to the annual contribution limit. Plus, any contribution room carried forward from previous years less any pension adjustments.
TFSA contributions aren't tax deductible, but you never have to pay tax on those same contributions, even when they are withdrawn later.
Joint bank account
Joint bank accounts are bank accounts shared by 2 or more people (some banks actually allow you to have up to 9 people). Other than that they are exactly the same as a single account. Though couples are the most common clients for joint bank accounts, they aren't the only ones who are eligible to hold them. Roommates, a parent and child, and family members, can also have joint bank accounts.
In a joint bank account, all the owners can conduct banking operations, such as transfers, withdrawals, bill payments, and more. The owners of the account can decide if such banking operations require consent from all members before going through or if each owner of the account can operate independently within the account.
What to look out for with a joint bank account in Canada
Of course, joint bank accounts can be a fraught proposition, especially for couples. If things aren't handled carefully, there can be complications if the relationship breaks up or one of the account holders passes away.
For one, if bad feelings arise, your partner on the account can cancel your debit card and make your life miserable. Each of you has just as much legal entitlement to the money as the other, so you have to mutually decide to close the account, which can be tricky if you don't want the same thing.
A joint bank account can also make things difficult in terms of financial discussions. Are you willing to be honest about your debt with the people you hold the account with? Do you even want them to see where your money goes? Are you comfortable setting a budget and sticking to it together? These are all questions you need to ask. Otherwise, things can get messy, relationships can end, and you may find yourself locked out of your money.
Business bank account
Business bank accounts are meant for those with businesses and therefore, business expenses, whether you're running a small business or you're at the top of a corporation.
All you need to open a business bank account is proof that you actually run a business. This is usually a HST number that proves you collect tax on your business services, as well as other documents that prove you own a business, such as incorporation documents or proof that you're a signing authority at the top of a corporation.
Once you're able to open the account and start spending on behalf of the business, you get special and very specific perks just for having a business bank account.
How are business bank accounts different from personal chequing accounts?
Business bank accounts are different from regular chequing accounts, as they're meant to support your business financially and help you separate your personal finances from your business finances.
They are also different because the bank gives you special perks just for having a business account. For example, Business accounts allow you to pay your business taxes online through online banking – just like income tax.
If you don't have a business bank account, you have to pay your business taxes by logging on to the CRA website, which is decidedly more inconvenient. You'll also get overdraft protection for your business from a business account, and digital assets to help you manage payroll, check balances, and send out ETFs or wires.
The fees and transaction limits are generally comparable to regular personal bank accounts, depending on what package you choose for your business account. As for whether you go with a big 5 bank or an online bank, that question is just as debated when it comes to business accounts as it is with personal accounts.
We would say choose an online bank if most of your business transactions are done online, but if you write cheques, go with a brick-and-mortar bank, such as one of the big 5 banks.
US dollar bank account
US dollar bank accounts are for those who get paid or deal with their finances in US dollars. They are advantageous because they often give you a better exchange rate than you would get if you deposited American money directly into your regular Canadian chequing account.
Having a US dollar bank account means you get to choose when you want to convert your money into Canadian, which often results in lower exchange rates, especially if you wait for the American money to accumulate in your account.
Plus, if you actually spend money in US dollars, like maybe doing a lot of cross-border shopping, you can actually make purchases directly in US dollars. This way, you won't have to convert to Canadian when you get paid and then convert back into USD when you make a US dollar purchase. All the back-and-forth is a great way to eat into your money thanks to the exchange rate and any accompanying conversion or transaction fees.
Let's take a closer look at how exchange rates work with these foreign currency bank accounts, such as a US dollar account.
How exchange rates work with foreign currency bank accounts
When you have a US dollar account, not only can you choose when to convert your money into Canadian dollars, but you can also get a different exchange rate – one that's usually a little better than the one you would get when U.S. dollars are converted automatically into Canadian dollars and deposited directly into your Canadian account.
If you're transferring US dollars from your US account into your Canadian account, a pop-up will let you know what that day's exchange rate is before the transfer is complete, so you can choose to do it right then, or you can wait another day when the exchange rates are a little more advantageous.
It should be noted that this dollar account is not the same as an account in the US. For that, you need a U.S.-based bank account, which you can open at your Canadian bank's American counterpart. However, you won't be able to access US-based financial products such as a Disney credit card or transfer money through US-based payment services like Venmo just because you have a US dollar account based in Canada. For that, you'd need a U.S. address or a U.S. phone number.
Kids bank account
A kids bank account is a starter account for a child. A place where they can put any money they receive as gifts or earn through an allowance. It's also meant to start educating children about money and how banking and banking products work.
Like some regular savings accounts, your child will be able to earn interest on every dollar they put in, which is another benefit of a kids bank account. If you do get a kids bank account for a child, you're looking for the following to really maximize its potential:
- no monthly fees,
- no minimum balances,
- the account earns interest, and
- it has a decent amount of free transactions.
Want more information on kids bank accounts and the best ones there are in Canada? Check out the best bank account for kids In Canada.

Bank account fees in Canada
As discussed earlier, there are certainly benefits to no fee bank accounts, but even these carry fees with them when it comes to ATM withdrawls or transaction fees. In fact, with all bank accounts there are fees you need to be aware of because nothing is entirely for free with a bank account -- it's usually just less expensive.
Let's take a look at where bank accounts usually ding you when it comes to fees.
Monthly maintenance or bank service fees
Bank account fees start with the monthly fee. This is the fee paid to the bank to maintain your account and keep it open.
You'll see monthly fees in Canada most commonly when you open an account with one of the big 5 major banks. They range from $3.95 for your most basic account to $30 for your premium option. When taken in isolation, these fees may not seem like much, but there are other places that banks charge you money and it all adds up.
Of course, it's entirely possible to avoid these fees. No fee bank accounts offered by the smaller branchless and online banks are built on waiving these fees forever in their entirety. Even if you still go with the big 5 banks for your banking needs, these fees can be waived as long as you maintain a minimum balance every month.
The minimum balance you have to maintain depends on your banking package (whether your account is basic, mid-level, or premium) and it goes up with every tier. Refer to our table on the different types of bank accounts above to see how the minimum balances break down for each account. In short, they range from $3,000 in the account every month for a base account to $5,000 or $6,000 for a top-tier account. It's quite a significant amount of money and only saves you from the monthly fee.
Bank transaction fees
Banks also charge you for various transactions.
These include purchases, transfers, withdrawal fees, and basically every time you ask your bank to process some sort of transaction. Most commonly that means a debit purchase at the point-of-sale, but it can also mean Interac e-Transfers. Though on most accounts, Interac e-Transfers are considered separate from regular transaction fees.
Given these fees, banks also use them in their banking packages by giving you a certain number of free transactions depending on which level of account you choose.
Obviously, the more the account level costs, the more free transactions are included in the cost of your banking package. In fact, once you get to the middle class or high class bank account tiers, your transactions are unlimited.
However, when you do have a limit to how many free transactions you can have, some transactions are included in that cap, while others are not.
For example, Interac e-Transfers usually have their own number included in your banking package before you start getting charged for them. That fee is usually around $0.50 for amounts under $100 and $1 for amounts over $100 – whether sending or receiving – unless your package includes unlimited Interac e-Transfers.
Therefore, we would advise going through the details of your bank account options thoroughly, especially the fine print, before committing to any particular banking package.
Or you can skip that step entirely with no fee banking, as transaction fees are another thing that no fee bank accounts don't charge you for. They also usually include either unlimited or a certain number of free Interac e-Transfers.
Wire transfer fee
Wire transfers are transactions where you are sending or receiving money between your bank account and someone else's.
You are usually charged more for sending money than you are for receiving it, but you are still charged on both sides. You will most often use a wire transfer if you're sending or receiving money internationally, so you will also be charged 2% on the exchange.
As for the base wire transfer fee, this can range from $15 to $50. For example, TD charges $16 if you're sending money to another TD account and charges $17.50 if you are receiving money via wire transfer (plus the exchange rate if it's an international wire transfer).
Actually, sending money internationally via wire transfer is where the real cost comes, due to the associated fees. This cost is higher with all banks, but at TD it is $50 plus exchange rate and any markup that comes with that.
The good news is it's possible to save money on wire transfers by going outside the big banks and using an international transfer service like Wise (formerly TransferWise Canada). If you use a service like this for your transfers, there are no hidden fees and all existing fees are easily researchable.
Wise in particular is 8 times cheaper than the banks, but transfers aren't instant, and can take up to a few days to complete depending on the destination. Still, Wise has options to send money over 50 countries and have the confidence that it will be cheaper to use a service like this than initiate a wire transfer directly from your bank account.
You can learn more with our full review here:

Mid-market Exchange Rate?
Hidden Fees?
Example Fees For $1,000
- USD: Start at $7.40
- EUR: Start at $6.34
- GBP: Start at $6.78
- INR: Start at $8.21
- CNY: Start at $15.66
Transfer Limits
- Direct debit: $9,500/day, $30,000/week
- Debit/credit: $3,000/transfer
- Interac e-Transfer: $25,000
- Bill payment/wire transfer: $1.5 million
Wise, formerly known as Transferwise, is an international money transfer service that allows users to send funds to 80+ countries, including Wise transfers in Canada. Transferwise was launched in 2011 by two friends from Estonia. The company started out offering international money transfers, and soon grew to include multi-currency accounts, business accounts, and a debit card. In 2021, Transferwise changed its name to Wise.
Pros
- Cheap international money transfers
- Transparent fee structure
- Free multi-currency account to hold over 40 currencies
- FINTRAC regulated in Canada
- Ability to enable two factor authentication (2FA)
Cons
- Your Wise account can be deactivated with no reason given
- Limits on the amount that can be transferred
- Relatively small list of countries
Provinces
ALL
Eligibility
See Issuer for Details
Why You Want It
Global money transfers that are up to 8x cheaper than banks + No hidden fees.
Special Features
- No hidden fees or markup
Mid-market Exchange Rate?
Hidden Fees?
Example Fees For $1,000
- USD: Start at $7.40
- EUR: Start at $6.34
- GBP: Start at $6.78
- INR: Start at $8.21
- CNY: Start at $15.66
Example Transfer Speed For $1,000
- USD: Same day
- EUR: Same day
- GBP: Same day
- INR: Same day
- CNY: Same day
Debit Transfer?
Credit Transfer?
Bank Account Transfer?
Paypal Transfer?
Transfer Limits
- Direct debit: $9,500/day, $30,000/week
- Debit/credit: $3,000/transfer
- Interac e-Transfer: $25,000
- Bill payment/wire transfer: $1.5 million
ATM fees
Just mentioning ATM fees can open an entire can of worms when you're banking. That's just because there are so many different kinds.
Let's go through them:
- Regular account fee – Charged by your bank, but usually covered by your banking package unless you get the most bare bones option ($0 - $2).
- Network access fee – Charged by your bank when you withdraw money from an ATM they don't own ($0 - $1.90).
- Convenience fee – Charged by privately owned ATMs and ATMs of financial institutions you don't belong to. It's usually rolled into the network access fee and the account fee by your financial institution, or it's charged right at the time of withdrawal.
- Foreign ATM fee in North America – Charged if you make an ATM withdrawal at an ATM in the US or Mexico. In addition to the fee, you will be charged a percentage of the foreign currency conversion ($3 + percentage conversion fee).
- Foreign ATM fee outside of North America – Charged if you make an ATM withdrawal at an ATM outside of America. In addition to the fee, you will once again be charged a percentage of the foreign currency conversion. ($5 + percentage conversion fee).
It should be noted that while you are charged by your own financial institution, you may get charged by the financial institution you are withdrawing from or, as noted above, the private ATM owner.
This means you will have to pay on both sides of the transaction. The Government of Canada estimates that If you withdraw from an ATM network that you don't belong to or you withdraw from a private ATM, fees can rise to as much as $7.90 at a financial institution you don't belong to and $8.90 at a privately operated ATM.
If you're looking to save on ATM fees, stay within your own bank's ATM network as much as possible. If you are a member of an online-only bank, choose one owned by one of the big 5 banks. For example, Tangerine (owned by Scotiabank) and Simplii Financial (owned by CIBC) and your ATM network will expand to that of the parent bank – giving you more options for withdrawing from more ATMs without paying fees.
There are also credit unions that belong to an ATM called The Exchange and they don't charge member institutions ATM fees across the network, so you can save on ATM fees that way too.
Overdraft fee
Overdraft fees apply if you have overdraft protection on your bank's account. To be overdrawn on your account is when your account is debited but you don't actually have the money to complete the transaction.
Overdraft protection covers your purchases beyond the money in your account. It's limited to a specific dollar amount of your choosing and protects the transaction until more money is deposited into your account. It protects you from the more expensive non-sufficient funds (NSF) fee (more on that in a future section of this article) and the interest charged for every day you're overdrawn.
Annual interest on an overdrawn account is usually 19% to 22%, which is as much as an annual purchase interest rate on a credit card. For example, if you're overdrawn $75 for 5 days at an annual interest rate of 22%, you'd be charged $0.23 in interest.
Just because you're paying for overdraft protection does not mean you're not also paying interest.
In fact, you'll likely be paying:
- the overdraft fee,
- the amount owing as soon as the equivalent funds or greater are deposited into your account, and
- any interest incurred in the intervening days before the money was put back into your account.
Bottom line: overdraft protection is still expensive, it's just less expensive than frequent NSF charges.
Different banks approach interest on overdraft protection in different ways. Some take the daily closing overdraft balance and prorate high interest on that, while others make it so it doesn't matter whether you pay back your bank account by the end of the day, week, or month, they still charge you on the draw. For example, Tangerine gives you a month to pay down your overdraft balance without incurring any fees or interest charges.
This isn't typical. Usually, there are 2 varieties of overdraft protection:
- Pay-per-use – This is a flat fee (maximum of $5) paid every time you go into overdraft protection and every time a purchase is made that puts you even further into overdraft protection than you already are.
- Monthly – You are charged a monthly flat fee ranging from $2.50 to $5 for the privilege of having overdraft protection, whether you actually use it or not. Some banks will waive the fee in a few months when you don't dip into your overdraft, but most do not.
You can avoid being overdrawn on your account by not having too many pre-authorized payments that you can't keep track of and by budgeting so that you don't spend money over what you are able to generate as income each month.
Another strategy is always keeping a buffer of a certain dollar amount in your account (enough to cover monthly bills and incidentals) that you never go over. This way, you never or hardly ever have to dip into overdraft protection. However, if you do get it, go with pay-per-use because it can save you a lot of money in monthly charges, especially if you don't actually go into overdraft that often.
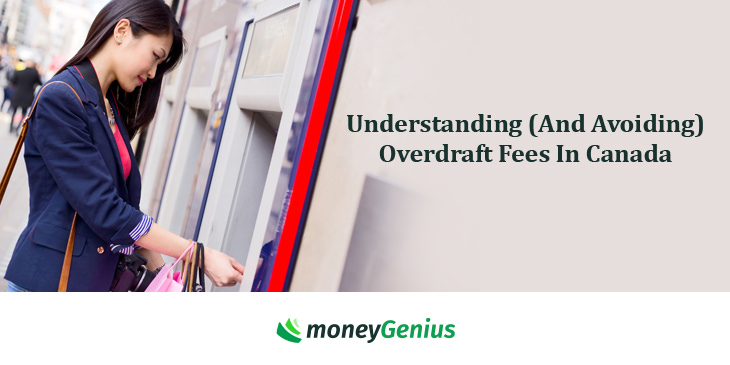
Looking to learn more about overdraft fees and how to avoid them? Check out this guide to understanding overdraft fees in Canada.
NSF fees
NSF fees are non-sufficient funds fees. These are fees charged when your bank account is debited but you don't have the funds in your bank account to make the purchase.
NSF fees happen if you happen to write a cheque that bounces or if you have a pre-authorized payment coming out of your account, but the money isn't in there and you have no overdraft protection to cover it.
What then ends up happening is you are charged an NSF fee and then perhaps also charged by the merchant for the bad exchange with a bad cheque/transaction fee. NSF fees range from $45 - $50 but vary depending on your financial institution. Your bank might also charge a penalty on top of the NSF fee and whatever the merchant charges (typically another $20 to $40) comes on top of that.
Worst of all, if you are routinely overdrawn, your bank may decide to close your account. Plus, while bounced cheques don't get reported to credit bureaus, other late payments that can result from NSFs do and can affect your credit score negatively.
The best solution is to use the same strategy you would to avoid going into overdraft protection. Keep a cushion that buffers you from not having money in your account, keep an eye on your pre-authorized payments, and monitor what's happening with your bank account in general.
After all, sometimes cheque deposits get delayed or an old account, long ago closed, gets debited so it's not necessarily not having the money in your account that's causing the overdraft.
How to open a bank account
Once you've figured out the types of bank accounts that are available to you, the various banking packages that you can get, and the fees associated with them, you're ready to actually open a bank account.
But just how do you do that? We'll walk you through it.
What you need to open a bank account
Anyone can open a bank account in Canada, but those 17 and under need a parent or legal guardian to sign off. All you need to open a bank account is proper identification. Canadians can choose several options.
You'll need 2 pieces of ID that could include the following:
- valid Canadian driver’s licence that can be used as ID under provincial or territorial law,
- Canadian passport,
- birth certificate issued in Canada,
- social insurance card issued by the Government of Canada,
- old age security card issued by the Government of Canada,
- certificate of Indian Status,
- provincial or territorial health insurance card that can be used as ID under provincial or territorial law,
- certificate of Canadian citizenship or certification of naturalization,
- permanent resident card or an Immigration, Refugees and Citizenship Canada (IRCC) form, and a
- provincial ID card.
You may also present one piece of ID from the list above and one piece of ID from the following options:
- employee ID card with your picture on it that has been issued by a well-known employer within the community,
- debit card or bank card issued by a member of Payments Canada, with your name and signature on it,
- credit card issued by a member of Payments Canada, with your name and signature on it,
- client card from the Canadian National Institute for the Blind with your picture and signature on it, and
- a foreign passport.
There's also a 3rd option: you can present a piece of identification from the first list and then a client from that financial institution (in good standing) can vouch for your identity, as can an upstanding member of the same community as the financial institution.
Bear in mind though, the bank may ask for additional identification if they are still suspect and can't verify your identity.
Another key component necessary to open a bank account is your social insurance number. A bank must ask for your social insurance number as long as you are opening an account that bears interest. They are required to send information – like how much interest is collected on the account – to the Canada Revenue Agency (CRA) for income tax purposes. If they want your SIN number for any other purpose, they need your written consent.
As a result, you need to have a SIN number, which is a form of ID. You can get one from the Government of Canada online, by mail or in person with the right supporting documentation, including a work or study permit if you're not a permanent resident.
Once you have the right ID and a SIN number, you can then open a bank account with proof of address. Some banks allow you to open an account online, but this depends on the documentation they need to see from you.
It's more than likely that you'll need to visit a branch in person and speak to a teller. They will walk you through everything they need to establish your account, issue you a debit card and even help you set up your PIN number and passwords for online banking.
How to close a bank account in Canada
Of course, there are always times you may want to close your bank account. Perhaps you can get a better deal on fees and features at another bank or maybe the bank account you were using is no longer necessary. Maybe you want to switch to your partner's bank and open a joint account with them.
Whatever the reason, there are several steps you need to execute to make closing an account and the transition to a new one as seamless as possible.
1. Research a new bank account
First, you need to find a new bank account that's better for you.
Choosing one depends on your priorities, what kind of account you want to open, and whether you want something for the lowest possible cost. You'll also want to consider whether you want something that'll give you the red carpet treatment with all the bells and whistles, or something in between both extremes.
For help and advice when it comes to choosing a chequing account, along with a deeper dive on that specific topic, visit our article on the best chequing accounts in Canada.
2. Transfer your funds to the new bank account
You can do this several ways. A cash transfer is best done in person at the branch, especially because you're likely withdrawing a considerable amount of money and will need to lift all transfer limits on your account. Withdrawing in person is also better if you want to avoid any fees.
Another option for moving money between banks is a bank-to-bank transfer. This usually completes within 48 to 72 hours and is the better option if you have multiple accounts with the same bank.
You can request a bank-to-bank transfer by phone, online, or in-person, but make sure you link the new account with the old account before you begin because some banks don't charge for transfers between linked accounts.
You'll most likely be able to link an external account to your existing one through online banking. BMO, TD, and Scotiabank all provide this option. If your bank doesn't, contact them for the most viable solution.
Regardless of how you're transferring the money, you will need to know the routing and bank account numbers for both the sending bank and the recipient bank, along with, obviously, the name and institution number of both banks. A big transfer like this should take up to 72 hours, but could take as much as 4 business days to go through.
3. Fix all your pre-authorized deposits and withdrawals
There's nothing worse than getting an NSF charge because you closed an account and forgot that a payment was still drawing from a now dead account. What about getting money you will never see going to an account that doesn't exist and will only get returned to the sender?
First, itemize all of your pre-authorized payments and any person or place that automatically sends you money. Then either:
- move them to your new account,
- cancel them if they're not relevant anymore, or
- contact your creditors and clients directly to inform them of the changes to your bank account.
4. Contact your current bank and let them know you're closing
Finally, once everything is done and your money is safely in your new account, inform your initial bank that you'll be closing your account.
There's usually a fee for closing your account, especially if you close it within 90 days of opening. The fee is usually $20, but the longer you're a client, the more likely you will be able to waive the fee.
Keep following up with your old bank until your old account is truly closed. Banks have been known to drag their feet when it comes to truly ending relationships, so you might be in for a long goodbye. And don't be surprised, if years later, the account you thought you closed is still open.
Therefore, be diligent and keep following-up until it's completely wrapped up.
How to make purchases in Canada
At the same time as there have never been more options in Canada for saving and storing your money, there also haven't been as many ways to spend it as there are now.
Canadians are living in an almost entirely cashless society, making it easier to separate yourself from your money than it has ever been.
How to use your debit card
Once you open a bank account, you'll be automatically issued a debit card. The teller who's walking you through the process will often help you activate your debit card and program your PIN number, or you may be sent the card in the mail with instructions on how to do so.
You can also contact your bank by phone and follow the prompts to choose a PIN number and activate your debit card yourself. This is particularly handy if you're reactivating a new debit card, which you'll receive in the mail at the expiration of your previous debit card.
Often when you open a new account, you'll be set-up with a daily transaction limit so you won't be able to make purchases over a certain dollar amount in one day. This limit can be lifted at your request or you may find that it's eventually increased by your bank automatically.
Accessing your money: debit card PIN and tap
Once you have your activated debit card, it's time to go out and actually use it on purchases.
At the point-of-sale, if they don't already ask you, tell the retailer that you would like to use your debit card.
If the card has this logo on it:
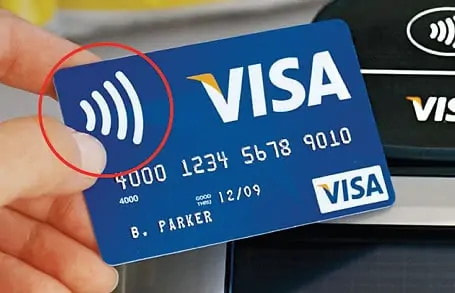
It's RFID (Radio Frequency Identification) enabled and you can simply tap your card on the payment terminal to automatically pay for purchases.
Simply hold the card a few inches from the matching logo on the terminal and your account will automatically be debited. This is also possible with credit cards.
However, there are security features with tap and pay technology that prevent you from tapping on purchases of $250 or more. Don't worry though, you don't have to put your purchase back on the shelf.
Instead, you can simply use your PIN.
- Simply insert your card into the front of the payment terminal with the gold or silver square in the corner of the card facing up, then follow the prompts on the screen on the payment terminal.
- It will likely ask you to verify your purchase and choose which account you want the money to be debited from (chequing or savings).
- Then you will be asked to enter your PIN – a 4 digit number that only you know that allows you to make purchases on the card.
Once the right PIN is entered, the payment will be processed and the purchase will be made. It's time to take your card from the terminal and move on after collecting your receipt.
How to choose and set up your debit card PIN
You may have noticed in the steps above that your PIN number protects you from someone making purchases with your debit card if it falls in the wrong hands (though they'll still be able to make small purchases up to $250).
So you have to make sure this 4 digit code is something only you would know and that you never share it with anyone. The more random you can make it, the better it is for your security.
It's also important when you're either withdrawing money at the ATM or paying at the payment terminal that you cover up the numbers so no one can see what you're typing as your PIN.
Also, if something seems amiss with the payment terminal itself, like the insert slot seems different or the prompts aren't what you're used to, cancel your purchase and avoid using that terminal. It could have been tampered with.
The safety of debit card tap
In addition to the inability to make purchases over $250 without entering your PIN, tap and pay technology is still very safe.
Purchases are processed through the same secure networks that your Visa, Mastercard, or Interac debit card uses. Also, each transaction is assigned a unique and encrypted code that changes every time you use tap and pay technology.
Tap and pay can only be used from a short range at the terminal, so no one will be able to read your card and make purchases from a distance. Plus, encryption makes the technology difficult to hack. Meanwhile, the information transferred during a tap and pay transaction is very limited. Sensitive information like your bank card number or even the security code on the back of the card are not transmitted during a tap and pay transaction.
Ask your bank about your daily debit card limit
As we discussed briefly before, in addition to transaction limits with tap and pay, there will likely be a daily limit on your debit card. This is the amount you can spend using your debit card in a day. This is to prevent thieves from going hog wild with your debit card and cleaning out your bank account.
In fact, the bank sets limits not just on debit card purchases, but on withdrawals, transfers, and even bill payments, just to keep you safe from fraud.
You can always discuss raising any of these limits, including your debit purchase daily limit, by phoning up your bank and telling them that you'd like to increase your limit.
Some banks, like RBC, allow you to edit your daily limits online so that you don't even have to talk to anyone and you can raise the limits yourself.
Daily limits are specific to the account you're opening and the length of time you've been with the bank.
They are available to view in the disclosure documents that come with your bank account or through online banking. Sometimes your daily limit will rise automatically according to the length of time you've been a customer in good standing at your bank.
Can you use a debit card online?
You can absolutely use your debit card online. Many debit cards come with either a Mastercard or Visa logo in the corner. This means they're treated the same way a credit card would be treated for online purchases.
To make an online purchase with your debit card, simply enter in the card details including the card number, expiry name on the card, and CVV number on the back, just as you would if you were making an online credit card purchase.
Be warned however, that some merchants will not recognize a debit card in this way and you will not be able to debit your account directly. In these cases, when your debit card is declined, it's best to use a credit card.
Using your Canadian debit card internationally
In addition to Canadian banks like TD having a presence in the U.S., depending on the credit card logo on your debit card, chances are good you would be able to withdraw funds from ATMs that are part of a network that either Visa or Mastercard owns.
Visa owns the Plus network and Mastercard owns Maestro, but check with your bank to see where you'll be able to use your debit card abroad.
Just note that you'll pay both the exchange and currency conversion fees for every amount you withdraw.
As for making purchases at the point-of-sale or online where the origin of the merchant is a foreign country, you'll be charged the exchange rate and a conversion fee of 1% to 3% (this is similar to a credit card and often called a foreign transaction fee). You may also pay duty on delivery of the item if it isn't less than $20 ($60 if it's a gift).
If you're travelling with a debit card, remember to inform your bank, as some may freeze your account if they see you travel outside of where you normally go.
What to do if you lost your debit card
If you lose your debit card, call your bank right away and get them to cancel your card, while also making sure they send you a new one.
If you can't call your bank right away, log into your online banking, or your bank's banking app, and lock your card. This way, no one can use your card while you're looking for it or until you cancel it.
If you find it again, you can easily log back into online banking or the app and unlock the card again. You can also request a new debit card through online banking or the app by selecting the "replace debit card" option.
Understanding pre-authorized debits
Pre-authorized debits may seem like a fast and convenient way to pay monthly bills, but they're much harder to reverse or even to dispute than pre-authorized payments on your credit card.
Banks still work on an antiquated cheque-based system when it comes to pre-authorized payments so to stop them is actually pretty hard. You usually need to fill out a form and specify exactly who you want the payment stopped from, how much the payment is, and how long you want it to be stopped for.
Plus you'll be charged a stop payment fee and the stop only really lasts from 6 months to a year.
Add to that, banks need exact business names to stop payments so if one of your payees changes their name slightly, the payment will still go through.
Yes, if things go sour with a pre-authorized debit, you could be in for a huge headache, but if things go smoothly, they can still be convenient and they're relatively easy to set up.
How to set up pre-authorized debits
When it comes to pre-authorized debits, you can either set up an automatic withdrawal or a direct deposit and both are relatively straightforward.
Both start with a pre-authorized debit agreement, which is the form you need to fill out and sign to give them permission to withdraw or deposit money directly into your bank account.
Make sure that if you're doing this electronically or over the phone, you're emailed a written confirmation for your records. The confirmation must be sent at least 3 days before the first time your account is debited and must include the details of the agreement.
To give the company or financial institution the account info they need, you'll need to provide a blank cheque, but to prevent anyone from using it, write "VOID," so they can't fill it out.
From there, it should be set up and you should be good to go.
How to use cheques in Canada
Though cheques are going the way of the dinosaur, they're still used occasionally, so you may need a few of them and it's important to know how to acquire them and how to use them if you do buy them.
How to buy cheques
If you bank with one of the Big 5 Banks, you'll likely get 1 pack of cheques included with your banking package. While it's highly unlikely you'll write enough cheques in this day and age to actually run out, if you do, you'll have to pay for the next few.
They can cost between $50 - $100 for 200 to 250 from The Big 5 Banks depending on the amount you get and the details you need, which is quite expensive.
How to write a cheque
Writing a cheque (when you have to use them) is pretty simple. We've laid it out for you step-by-step below:
- Step 1: Write the date in the top right-hand corner.
- Step 2: Write the person's name who you're making the cheque out to on the first line in the middle.
- Step 3: Write the amount of money you're sending them in words (for example, one-hundred dollars) on the line below that. If there's any room left on the line, draw a line so it can't be filled in with extra numbers.
- Step 4: In the box just under the date, write the amount in numbers (including cents) to 2 decimal places even if the amount of cents is zero.
- Step 5: On the memo line in the left bottom corner, write what the cheque is for and then sign it on the line in the bottom left-hand corner.
How to read a cheque
Reading a cheque is pretty simple, but there are things you should know.
First off, a cheque should be read from left to right. In the top left-hand corner you'll see the institution that issued the cheque, their address, and sometimes the name of the individual who is paying out the cheque to you.
Directly opposite that in the top right corner is the date that the cheque is valid from. If you were to attempt to deposit the check before then, the money would not be able to be cashed out. Right above the date is the number in the sequence of cheques in the person's cheque book. That way, they know which cheque number goes with which cheque, and it helps keep their own records organized.
On the 1st long line below, you'll see "Pay to the order of" and then the full name of the person who's entitled to deposit the cheque. Right below that you'll see the amount of the check written in words. If there is space on that line, there should be a line drawn so no one can write in whatever they want.
Immediately to the right of the amount is the dollar value in numbers. Then directly below those 2 elements is where you'll see the amount written out in words.
Finally below that in the bottom left corner is the memo line. This is where you'll see what the cheque is supposed to be for. This is called the memo line and it's meant to remind the depositor why the cheque was written. The memo line is always optional to fill out.
Beside the memo line in the right-hand bottom corner, you'll see the signature authorizing the cheque to be deposited and proving that it was written by the person who signed it.
Then finally, on the very last line at the very bottom, you'll see a sequence of numbers. This sequence of numbers tells you the issuer of the cheque's transit number, institution number, and the writer of the cheque's account number. It tells the bank where to transfer the money from when the cheque is deposited.

Canadian credit cards
Besides debit cards, the other primary way to pay for purchases is through a credit card.
A credit card is a form of revolving credit. Revolving because you're constantly charging purchases on it and then paying it back and charging more purchases and paying it back. Revolving credit can be used and paid down repeatedly as long as the account remains open.
The main global networks that support the payment of credit cards are Visa and Mastercard which basically are fintech companies at this point. They provide the payment system and processing mechanisms that credit cards exist on.
They're not credit card issuers, so they're not who you're paying back. Instead, you're paying back the bank that issued the credit card. You can get a credit card from any bank, not just your own, and the bank that you get it from doesn't have to provide banking services other than credit card, such as MBNA.
There is one credit card payment system that's also an issuer of credit cards: American Express. Amex cards are known for not being accepted at some big places (namely Costco and Loblaws), but they also have some of the best rewards and perks in Canada.
That's because many credit cards reward you for using them, either with cash back or points for travel, merchandise, statement credit, gift cards, or experiences.
If you want to find the best card for you, whether that be cash back, points, no fee and more, visit our best credit card page.
Credit card interest and grace periods
When you make a purchase on your credit card, the lender pays the merchant upfront for you and it's your responsibility to eventually pay the lender back. The way the lender incentivizes you to pay them back is by charging interest on your collective purchases – known as your credit card balance.
Every month, you'll get a statement showing:
- how much you owe on your credit card,
- when the statement closes for that month,
- any new purchases you've made within the statement period,
- the minimum payment you need to make, and
- the deadline you need to make it by to not be considered late on your credit card payment.
If you pay off your credit card by the time each statement arrives, you don't have to pay interest on your purchases. This period between when you get your statement and when the next payment is due is known as the grace period and it varies depending on when you get your statement and when your deadline is (usually 21 days).
If it turns out you can't pay off your balance within the grace period, you'll be charged interest on your remaining balance. Credit card interest works according to the terms laid out in your credit card agreement, which you received when you were issued the credit card.
Generally, it's a daily rate calculated by dividing your annual percentage rate (the one that's often advertised, such as 19.99%) by 365, and then multiplying your current balance by the daily rate.
The larger the balance, the more interest you'll be paying – so it's best to pay off your credit card as fast as possible.
If you do carry a balance often, you may want to look into a card with a balance transfer offer. These are cards with a low interest rate on an existing balance that you move over to the card, either for as long as the account is open or for a limited period of time (such as 4, 6, or 12 months).
Balance transfers are when you transfer your balance from one card to another and start paying it off there. It should be noted though that if you do perform a balance transfer, the balance will be under the low promotional interest rate, but if you make any new purchases, those will be charged at the regular purchase interest rate.
You should also note that there's usually a balance transfer fee of up to 3%, plus you can't transfer balances between cards that are provided by the same issuer. In any case, a balance transfer is a good option to try to pay off your balance faster.
Check out the best balance transfer offers in Canada.
Prepaid credit cards
Prepaid cards are kinda like a mixture of debit and credit cards.
They're prepaid because they either come preloaded with certain monetary denominations (like $20, $50, $75, $100, $200, or $500) or you can load them yourself with any amount of money you like.
They're available at banks as well as places like post offices and corner stores and are often reloadable.
While it's nice to have $100 sitting on a prepaid card, many prepaid cards don't come with rewards. You also miss out on the free insurance benefits that often come with credit cards.
So prepaid cards are good for one-time purchases, or things you have specifically in mind to use them for. They also make great gifts, but they're limited in their flexibility and usefulness compared to a debit card or credit card.
That said, there are some relatively new prepaid credit cards that add perks like rewards and insurance. Click here to see the best prepaid cards in Canada.
Wire transfers
Wire transfers are mostly used to send and receive money between bank accounts either internationally or domestically. As we discussed in the previous section on fees, they carry some of the highest fees for the transaction whether you're sending or receiving the money.
The domestic fees on wire transfers are significantly cheaper (that is if you're sending money between bank accounts within Canada) costing around $16 if you're sending money between accounts within the same banking network, but $50 if you're sending money to an account in another country.
That's without purchasing the other currency you need to or the fees that the bank you're transferring to may charge.
Wire transfers have their uses – like if you're sending or receiving a large enough sum that the resulting fees are negligible – but they're the old-school way of sending money between people.
There are so many cheaper alternatives that include:
- Interac e-Transfers – This is one of the cheapest ways to send money between people within Canada and all you need is an email address for the recipient and a secure password that they're given to access the money.
- Wealthsimple Cash – This is Canada's answer to all the peer-to-peer (P2P) payment services that are available in the US, such as Venmo, Zelle, and Cash App. It's an app where you can send money as simply as typing in a chat. Plus, there are no fees for sending or receiving money and no monthly fees for having an account.
- Wise – Wise is a website and 3rd-party system for sending money internationally at a cheaper exchange rate than the banks can offer with no markups.
Crypto
Though some believe cryptocurrency will be the future of money, so far the Canadian Federal Government is treating it as a commodity to be invested in and not as legal tender, which limits what you can actually buy with it.
The reason for this is crypto's volatility. If it's to be the future of money one day, it has to be much more stable. As a result, not very many offline merchants allow customers to purchase goods directly in cryptocurrency.
However, there are both physical and digital prepaid cryptocurrency credit cards out there where you can load the card with cryptocurrency from your crypto wallet, which is then converted to fiat currency at the point-of-sale.
This means that indirectly, you can buy whatever you want with cryptocurrency. Just be aware that the crypto conversion rate for purchasing fiat currency may change from day to day, so it'll be hard to know the real price of the goods you're buying. It can be one cost one day and another cost another day.
All that being said, there are things you can buy online directly with crypto. The easiest and most straightforward of these is more, or different kinds of, crypto, as well as fiat currency and NFTs (which some believe are essentially vehicles to get people to buy crypto anyway).
If you're still confused and feel all this is over your head, read our deep dive on cryptocurrencies to get an even better handle on things.
Digital wallets
Digital or mobile wallets are "wallets" that live on your phone with digital versions of your credit and debit card.
At the point-of-sale, all you need to do is open your digital wallet at a merchant that supports digital wallet technology from Google Pay, Samsung Pay, Apple Pay, or Android Pay and tap your phone against the merchant's digital wallet reader.
Similar to tap and pay, the transaction then goes through instantly and your terrestrial account, whether a debit or credit card, is instantly debited.
The only drawback against digital wallets is that not enough merchants currently support the technology to make it ubiquitous.
Once that happens, Canadians will be able to leave their wallet and their cards at home and simply bring their phone to make their usual purchases. After all, aren't we all bringing our phones everywhere anyway as the one piece of technology none of us can live without? Wouldn't it be so much better if you can worry about one thing (your phone) instead of 2 things (your wallet and phone)?
Digital wallets are safe and secure because your financial information isn't actually stored on the phone and everything is encrypted. Plus, many of them use facial or fingerprint recognition technology to verify a purchase before it goes through, so there is an extra level of security.
For extra convenience and the possibility of joining the future as an early adopter, digital wallets are a great way to pay.
How to budget – and actually stick to it
You've probably heard it all before. Budgeting is the foundation for good money management.
It will allow you to see how much is coming in, how much is going out, and what you're actually spending your money on. That way, going forward, you can spend money more consciously.
Trust us when we say it makes a world of difference, but we also understand that it takes discipline and, at least at first, can feel very restrictive and limiting. You might actually ask yourself at times, "Why can't I buy that $1,000 item? I work hard and I deserve it."
And you do, we agree. But with a budget there can be conditions on that. You get to ask yourself, "Is it in the budget?" and "If I buy this now, what might I be missing out on in the future?"
But budgeting can be hard, especially at first. Actually being motivated to do it is all about finding the method that works for you. We're all well aware that budgeting isn't going to work if you hate it – you'll just give up on it.
With that in mind, may we present you with some of the various philosophies out there and the various ways a budget can look.
50/30/20 budget
The 50/30/20 budget is based on a very specific budgeting rule popularized by American Senator Elizabeth Warren that allocates your after-tax income in the following way:
- 50% on needs,
- 30% on wants, and
- 20% in savings.
This budget is useful because it gives you a very simple and straightforward plan when it comes to what to do with your money.
Of course, you're probably not going to hit these targets all the time (very few of us are that pious). However, if you do dip outside of those allocations on occasion, it can be the signal you need that tells you that you have to reign it in.
Zero-based budgeting
Zero-based budgeting is a budget philosophy that comes from the corporate world. When applied to a personal budget, its main goal is to help you live below your means.
It posits that every dollar you spend within a given period must be justified and accounted for. Meanwhile, those expenses cannot exceed your earnings in a given period.
Let's say your time period is a month. The goal is for your income minus your expenses to not dip below 0.
Basically, it works like this:
- Step 1: Track your expenses throughout the month and add them up at the end of the month (this includes both fixed and variable expenses).
- Step 2: Subtract all your expenses from your after-tax income.
- Step 3: Allocate the remainder to savings and debt.
- Step 4: Start fresh at 0 in the next month and do it all again.
As you can see, a zero-based budget requires considerable self-discipline. By its very nature of considering every dollar, you'll find yourself saving and conserving instead of spending. Plus, the money you do spend will be spent much more consciously since you don't want to get to 0 in the month.
This budget forces you to keep impeccable records, it forces multi-income households to communicate about their spending, and it forces everyone in the home to account for every dollar.
This level of accountability may work for some, but it can be stress-inducing. A zero-based budget is also not very good at considering long-term, more intangible goals because everything starts at 0 each month.
It may seem strict, but some people need that level of discipline in their lives financially or they're liable to go off the rails with their spending.
If that sounds like you, maybe you should consider switching from a more traditional budget, which makes you plan out your spending ahead of time and may lead to spending more than you need to, to a zero-based budget, which automatically makes you spend more conservatively.
Budget spreadsheet
If you're more accustomed to a more traditional budget spreadsheet, we have you covered there as well.
To start your spending plan off on the right foot, we've taken the liberty of saving you a bit of time and created a traditional budget template that you can use to track and monitor your expenses.
It has a place to write down your monthly goals, as well as your income and expenses for each month of the year, and it's absolutely free.
Bonus: Download your
free budget template right here and good luck in your future financial planning!
How to start retirement planning in Canada
It's never too early to start planning for your retirement. The standard age to start receiving Canada Pension Plan (CPP) payments is age 65, but you can start collecting them as early as age 60 or as late as age 70.
CPP payments are based on your average earnings during your working life, the CPP contributions you made during that time, and the age you are when you start receiving them. The earlier you start receiving CPP payments, the smaller your payments will be.
CPP contributions are taken directly from your paycheque and matched by your employer. You can make independent contributions, but you won't be able to access the funds until age 60, unlike an RRSP or TFSA where you can take out money if you like. There are no penalties for taking out money from your TFSA, but you will have to pay tax on your RRSP withdrawals.
You can always contribute to an RRSP, TFSA, or just a regular savings account to build up your savings.
We recommend adding "saving for retirement" as a component of your budget and you can either use the "Pay Yourself First" method and sock money away as soon as you get your paycheque or set up an automatic transfer to your savings account, your TFSA or RRSP, so you're saving without even thinking about it.
And if you invest that money further, suddenly you'll have even more growth potential and save even more money while you sleep, especially if you have a long time horizon, such as retirement.
Magic of compound interest
It's the power of time that gives you the magic of compound interest – and before you know it, you'll have more money than you know what to do with.
So what is compound interest? Essentially it's the ability to earn interest on your interest.
Here's how it works.
Let's say you have $1,000 in a high interest savings account, which offers a rate of 2% interest.
$1,000 x 2% = $20 added to your $1,000 in the first year (I know, it doesn't sound like much).
But, if all that happens is your money sits there (and you don't spend a penny of it) in the second year, something magical starts to happen:
$1,020 x 2% = $20.40 added to your $1,020 in the second year.
On its face, it's still not much, but when you step back and realize that you earned that $20.40 for doing absolutely nothing. That's $1,040.40 after 2 years and if you keep adding to your principal on top of that, you could earn even more just by sitting back and letting it happen.
Take the journey of someone who's earning interest, but also contributing more savings at the same time. Here's an example from our article on compound interest.
Kairi decides to jump in and save $5,000 right away when she is age 20.
She continues to add $5,000 every year for 15 years and then stops. She consistently earns 6% interest per year.
- Age 20 – $5,000
- Age 21 – $5,000 x 1.06 + $5,000 = $10,300
- Age 22 – $10,300 x 1.06 + $5,000 = $15,918
Time passes…
- Age 33 – $94,411 x 1.06 + $5,000 = $105,075
- Age 34 – $105,075 x 1.06 + $5,000 = $116,380
- Age 35 – $116,380 x 1.06 = $123,363 (Only interest, no more contributions!)
More time passes…
- Age 64 – $630,591 x 1.06 = $668,427
- Age 65 – $668,427 x 1.06 = $708,533
As you can see, her balance grows at a pretty rapid rate after a while and by the time she's ready to retire, she's really raking it in.
You can be in that position too and this savings calculator can play a small role in helping you get there, letting you see exactly where you could be by age 65 if you consistently contribute to your retirement savings and let the power of compound interest do the rest.
Savings Info
Don't be afraid of your retirement planning starting small
Kind of mind-blowing, eh? See, it really doesn't take much to get started. Then, as you feel more comfortable, you can start contributing more and more until you can stop contributing and just let the interest do the work for you.
Of course, there are several things that come up in life that may change the frequency of your contributions, your time horizon, or even your ability to save what you've been saving, but with the right tips and preparedness on your part, you can still save no matter what may happen.
How to practice good money management during major life changes
Sure, it's fine to remain financially disciplined, stick to a budget, invest, and save for the future, but life is what happens while you're making other plans. There are certainly various significant life events that can really impact and change the way you manage your finances.
Here's just a sample of some of these big life events and what you should do as far as your finances go for each.
Bonus: Check out our
How To Practice Good Money Management: Life Events infographic!
Receiving a lump sum of money
Lucky you. You've fallen into a bit of money whether from an inheritance or maybe a prize, like winning the lottery.
But do you even know what you should do when this happens? (For the record, spending it all in one shot is the wrong answer.)
No, instead you should take the following steps:
- Figure out your financial goals: The first step to making a plan for this money is defining your financial goals. What do you want to do with it? Ask yourself, "What are my financial goals?" "When do I hope to achieve these goals?" and "What are the obstacles preventing me from achieving them?"
- Develop a plan to achieve your financial goals: Once you know what you want to do with this money, do what you need to do to make it happen. For example, if one of your goals for the money is to invest it, do what you can to get a financial advisor.
- Open a bank account if you don't have one: If you get a large sum of money, you're going to need a place to put it, so if you don't have a bank account yet, for whatever reason, open one as soon as possible. If you already have a bank account, re-evaluate whether you're earning high enough interest on the money you already have in there and find the best high interest rate, so this money starts making you more money.
- Create a budget: There's that word again. A budget is what will help you determine how much of this money you want to put in savings, how much you want to spend, and how much actually has to go towards expenses. You can also track how much of it is going out, what is still coming in, and whether you can actually afford the goals you set for this money.
- Pay off your debts: Maybe you have some long festering debt that you'll finally be able to pay off with this money. Take care of it before you do anything else to get it out of the way so it will no longer hamper your dreams for the money. Pay off the highest interest debt first so you're saving the most you can in the long run.
- Set savings goals: Ask yourself how much your dreams for this money will cost and figure out how much you still need to save to make them happen. Having savings can also create a buffer when unexpected expenses arise so you don't actually spend your newly acquired nest egg.
- Use good judgement: It's amazing how many people come out of the woodwork asking for money the moment you come into some. Exercise good judgement and only help out or invest with the people you've actually vetted and researched and the projects you actually believe in. You don't want to fall into a scam or waste your money on someone's pipe dream.
- Create a will: If you have come into an amount of money that's sizable enough to leave to your dependents, do a will to figure out where the money will go and ensure that your remaining family is taken care of when you pass away.
Losing your job
No one wants to lose their job, but it does happen on occasion. Don't worry though, you can bounce back if you follow the steps below:
- Tell everyone: You never know where your next opportunity is going to come from, so don't keep the fact that you lost your job a secret. You never know when it might come back to benefit you in the end. Someone always knows someone looking for a great potential employee.
- Make at least the minimum payments on your debts: When there's not much money coming in, it can feel like you're treading water because the bills don't stop. You probably won't be able to make the size of payment you're used to when you have a job, but maintain making the minimum payment so that your credit isn't affected and you don't start defaulting on your bills.
- Review your budget: Losing your job will put your budget under a microscope. Scrutinize your budget to figure out what isn't as essential as you thought and where you can pull out extra money for the essentials.
- Prioritize necessary expenses over wants: Those things you've always wanted to buy, now is not the time to buy them. Instead, it's time to hunker down and buy only the bare necessities. Of course, it's also important to have fun once in a while, just keep your ambitions small. Rather than dinner and a movie, just go to the movie and have dinner at home.
- Adjust your spending: You need to adjust your spending so you can live on less income. Find ways to reduce costs on your needs and seldom spend money on wants.
- Use your savings: This is the type of unexpected, potentially emergency situation where it's okay to dip into your savings a little bit for needs only. Still contribute to them if you can, but this type of situation is what savings are here for.
- Take advantage of any severance or termination pay you've received: Termination pay is the minimum you're entitled to if you are let go through no fault of your own. Severance pay is meant to bridge the gap between your previous job and your next job. Now is the time to take advantage of these payments, as they certainly can cushion the blow when you lose your job and make life easier as you look for your next one.
- Register to collect employment insurance (EI): EI provides financial support if you lose your job through no fault of your own by paying you a percentage of your income up to a certain amount. Apply for EI as soon as you lose your job because it takes a while for benefits to start.
- Look for and apply for jobs: While the rest of the above is happening, you need to be hitting the pavement and getting your resume out there. This goes without saying. After all, nothing solves the financial issues that come with losing your job like getting a new job.
Getting married
Getting married is a joyous time as you commit to your greatest love for life. But, at the same time, a lot comes with uniting 2 lives, including getting on the same page financially and taking advantage of those financial benefits that now are afforded to you as a couple.
Here are some things you should keep in mind as you now begin to officially navigate your finances together.
- Have the money conversation: Even though it can be awkward, have the money conversation early in the relationship and certainly before the wedding if you haven't already. During it, try to get an understanding of each other's financial situation. It will help you be able to make better financial decisions together and hopefully help you avoid arguments about finances. Be honest. Hiding debts will only be detrimental to your relationship.
- Set savings and investment goals: Set your savings and investment goals together. Figure out what you'd like to save for and what you want to invest in by creating common financial goals as a couple and discussing how you plan to reach those goals.
- Discuss your options for managing your money as a couple: Here is where you discuss whether you plan to open a joint bank account, share a savings account, a credit card, and more. Here's where you discuss not only how you would like to bank together, but also how you would like to budget together going forward.
- Update your insurance policies: This is the moment you will likely want to add your partner as a beneficiary on your life insurance policy or other policies you may hold. You also want to inform anyone holding any property and casualty policies such as home insurance or car insurance that you are now living with someone who will also benefit from this policy. Be warned, your premiums may go up as a result.
- Investigate your tax benefits and credits as a couple: It's advantageous to start filing your taxes as a couple because you'll likely be eligible for the Spousal Tax Credit, which may cut your tax bill by up to half.
- Pool charitable donations: If you pool your charitable donations, you'll get an even bigger tax credit than you could get as a single individual. You can do this by having one partner claim the charitable donations of both members of the couple.
- Pool medical expenses: If the person in the couple with the lower income claims the couple's collective medical expenses, they can claim a higher tax credit and a lower tax bill for the couple.
- Plan your wedding budget: A wedding can be a big expense depending on the size of the celebration. It can cost thousands of dollars, but making a wedding budget may help you avoid spending more money than you planned. It can also ensure that you'll have money left over to fulfill your other financial goals.
Having kids
Introducing a whole other human being into your life takes some financial planning and will reorder your financial priorities to a significant degree.
But there are ways to be prepared, at least a little bit, for a life event you can't fully prepare for. All you have to do is follow these steps as a guideline and you should be okay.
- Deal with outstanding debt: In preparation for your child and throughout their lives, you will be spending a lot of money due to their arrival, so it's best to clear any outstanding debts before they're born, so you can start fresh with your finances. After all, you'll need all the money you can get when they arrive, so it's best not to have it tied to previous purchases.
- Set up a dedicated savings account to deal with the costs of having children: Setting up a dedicated savings account for expenses related to your child can keep you organized as far as how much you're spending on your child and knowing where that money is going.
- Discuss parental leave options: Here's where you and your partner will have to discuss what kind of parental leave you plan to take and for how long. Once you've decided on a plan, apply for your desired option, such as maternity leave or paternity leave, right away. It can take a while for the benefit to kick in. Also, your employer may supplement the amount you get through EI, while on parental leave.
- Start looking into childcare options and costs: Daycare is incredibly competitive, so start researching your childcare options, either public daycare, private daycare, home daycare or something else entirely, right away. This is because once your child is on the daycare list, it can take up to a year or more for a spot to open up.
- Request a record of employment to apply for EI: You're going to need a record of employment if you want to get topped up with some income when you're not working while on parental leave, so get that well before the baby comes because getting the EI benefit itself can take time.
- Apply for parental and maternity benefits: You're going to need these benefits to be able to care for your child one-on-one in the first year, so as soon as you know you're expecting, organize the proper paperwork and get that application sent off. Don't wait until you're going to the hospital to have the baby to file the paperwork because parental leave starts the moment you get home from the hospital.
- Save for your child's education: It's best to open a Registered Education Savings Plan (RESP) for your child as soon as possible so you can maximize the matching benefits your child would be entitled to from the government. Were your child to explore post-secondary education after high school, you only have roughly 18 years to save, so it's important to get on it right away. Also, the school they go to doesn't necessarily have to be a university, so your child may still be able to use the money no matter what their education ends up being.
- Review employer's benefits plan: Don't forget to add your child (your new dependent) to your employee benefits plan. This will give them the same coverage you have for dental appointments, pharmaceuticals, and medical procedures not covered by your provincial health plan.
- Update your budget: Your budget must now factor in another person and the expenses that come with that, so it's important to update your budget with your child and their needs in mind.
Getting separated or divorced
Separating or getting divorced is likely one of the hardest things you'll ever have to do, but you can make it slightly easier if you are able to follow the below throughout the process:
- Seperate what you own and what you owe: Doing this exercise will make it easier when it comes time to start dividing property. Separate what you own as a couple from what you own as an individual. Make sure you know what everything is worth in the present and what it might be worth in the future. A financial advisor can help you figure out the worth of some of your investments in the future. Once that's done, figure out what you owe as part of a couple and what you owe as an individual.
- Deal with joint debts and accounts: Decide right away what to do with joint accounts and joint debts you may owe together. If you decide to keep a joint account open, you may want help from a lawyer or a mediator to draw up an agreement as to what partner is responsible for depositing into the account in order to pay joint expenses. If your former partner is an authorized user on your credit card, make sure to remove them from the account and if they're a co-borrower, make sure to close that account. Once you have closed joint accounts or paid off joint debts, check your credit report to see that it reflects that and report any errors that you might see to the credit bureau.
- Divide property: When it comes time to actually divide property, seek the advice of a lawyer or mediator to make the process as legally smooth as possible. Common-law partners do not have to legally separate property, but those who are married must divide any increased value of something you may have owned before you got married equally between the partners.
- Update beneficiaries: You may want to remove your former partner as a beneficiary on your insurance policies while keeping any children as beneficiaries. Review your insurance plans and make sure you send the updated information to your insurance advisor. Once insurance is done, move on to the beneficiaries of registered accounts such as RRSP or TFSA, as well as any retirement income you may be entitled to through CPP or employer-sponsored pensions.
- Inform the CRA: Inform the CRA that you and your partner are no longer together. This will affect many of the benefits and credits you were once entitled to as a couple.
- Transfer registered accounts: You will have to divide up registered accounts. These include your RRSP, TFSA, RRIF, and any CPP credits you may receive. Remember that when you withdraw funds you will have to pay tax on that income.
- Update your banking information: Update your banking information to reflect your new singledom. This includes updating your address and making sure you're no longer listed on any credit cards or joint accounts, and that these have been properly closed.
- Rebuild your credit history: Once you are once again single, review and update your credit report and correct any errors you may find by contacting each credit bureau.
- Figure out child or spousal support: Potentially under the advice of a lawyer or mediator, figure out how much you'll be paying or receiving in child or spousal support. You cannot deduct child support from your taxes, but you can deduct spousal support if you're paying it. If you're receiving spousal support, you must claim it as income. You cannot claim child support as income. It should also be noted that if you're common-law or you're separated but not yet divorced, provincial law applies to these matters. If you're divorced, then these matters are governed under federal law.
10 more money management tips
And there you have it, we're almost at the end of our journey through money management, paying for purchases, and banking in general.
However, before we leave you, we just want to give you a few other tips, based on what you've learned, that you can apply every day.
1. Build a comprehensive and detailed budget
As you've seen, budgeting factors into several aspects of your financial health, especially when going through unexpected life events when you may have to review and modify your budget several times.
Decide on how you want to handle your budget, whether that's through the 50/30/20 method, zero-based budgeting, or a good old-fashioned budgeting spreadsheet.
Whatever you decide, make sure your budget covers everything in the expenses and income categories, and that you have enough to cover what you need to.
2. Find ways to save
Figure out ways to trim day-to-day costs everyday. You'll find many tips to save money right here at moneyGenius, but some examples may include:
- preparing lunch from home instead of going out for lunch,
- turning down your thermostat a few notches,
- opening a no fee bank account,
- getting cash back or rewards on your credit card,
- and more.
3. Review automatic payments and other unnecessary costs
There might be money being taken out of your bank account right now that you don't even know about. Look at your bank statement and your credit card statement to review what's coming out.
If you see debits in there that you don't recognize or automatic payments that you no longer need, such as an outdated subscription that you didn't know was still drawing money from your account, do what you can to stop payment and cancel them.
There may be other unnecessary costs that you need to review that aren't automatically debited, so review your bills of all kinds to see where you can cut costs.
4. Take advantage of online banking to stay organized
Online banking can help you do things like:
- schedule bill payments,
- review your spending, and
- set payment reminders.
These days, you can even set up email reminders that will tell you when you're close to your credit card limit or even when your bank account is low on funds.
Online banking is also better at tracking money in and money out than it has ever been, providing graphs and visuals where you can track your spending and your income.
5. Pay the least amount of interest you can
When paying your bills, pay the bill with the highest interest charges first and make sure you at least make the minimum payments on all your monthly bills.
Look for ways to consolidate the payments that you're making by either negotiating with your creditors or choosing all-in-one accounts and consolidation loans. Also, take advantage of balance transfer offers on credit cards and choose lines of credit over a credit card for a lower interest option.
6. Set clear financial goals and develop a plan to achieve them
Setting clear financial goals and discussing with your household or family how to achieve them can help you figure out how much you need to put aside to accomplish each of your financial goals.
Don't forget to pay yourself first with each paycheque by setting up automatic transfers to your savings account, RRSP, or TFSA. Also, don't forget to take advantage of high interest savings accounts and the power of compound interest.
7. Take advantage of tax credits and benefits
You shouldn't be paying more tax than you need to.
Work with an accountant to take advantage of all the benefits you're entitled to, such as the Canada Child Benefit, and make sure you get all the credits you're entitled to depending on your financial situation, such as if you're part of a couple or if you're a small business owner.
8. Open a registered account
Open an RRSP or TFSA to be able to save money on a tax-deferred or tax-sheltered basis.
If you have a child, open an RESP to take advantage of the matching benefits the government will afford you.
The same thing applies to RDSPs if you happen to be a Canadian with a disability.
9. Use the benefits of any workplace plans
Take advantage of any workplace plans that are available to you.
These include:
- medical benefit plans,
- matching benefits for charitable donation and retirement, and
- even expense accounts or professional development opportunities covered by your employer.
To not take advantage of what's available will leave money on the table and cost you money by increasing your out-of-pocket expenses.
10. Reach out for advice
Whether it's a financial advisor, an accountant, or a personal finance website. Use other people's knowledge to your advantage.
You can't possibly know everything, but the advice of experts can save you money as long as you research their background and where they're coming from, so that you can vet their expertise and feel confident they know what they're talking about.
What does your money management journey look like?
And, at long last, that's a wrap!
We trust you found this article interesting, informative, and entertaining. We hope this can make decisions surrounding the scary topic of your banking a little easier.
Like what you learned? Be sure to share this knowledge with your friends and family and spread the love on social media!
FAQ
What are the main types of bank accounts in Canada?
While the main bank accounts you'll see most often paired together are a chequing and savings account, within most banking packages you'll find a tiered structure of bare bones, basic, mid-level, and premium. Each of these levels come with their own perks and fees. Check out the types of bank accounts above to find the best bank account that works for you.
How can I make a purchase in Canada?
There are so many options when it comes to making a purchase in Canada – whether it's a debit card, a credit card, a mobile wallet or a peer-to-peer payment app. With so many choices it can be difficult to figure out what would work best for a particular purchase. But our section on how to make a purchase will certainly bring clarity in terms of which payment methods are out there and the advantages and disadvantages of each.
How to close a bank account?
Closing the bank account is necessary especially if your financial situation changes or you just want a better deal. Still, there are fees that can be associated with closing a bank account that you need to be aware of. It can also be a delicate process to execute, as your previous bank will do everything it can to hold on to you as a customer. This is why our step-by-step guide on exactly how to close a bank account will surely help you navigate the situation.
How to make a budget?
A budget is absolutely essential for good money management. Without one you're liable to overspend and not know where your money is going. Thankfully, building a budget is relatively easy and with our budget spreadsheet, you'll have no problem tracking your income or your spending.
What are some major money management tips?
In addition to budgeting, it's important to set financial goals, take advantage of compound interest, and build out your savings – along with having clear conversations about money with your partner or spouse. You should also start planning for your retirement no matter your age, and find ways to cut costs where you can. For more money management tips, read the article above.